Engines
In this part of the tutorial, we will go over engines and what you can do with them. We will also talk about the customization this brings and how to deal with resources.
Engine types
You can request an engine by using the requireEngine<EngineType>() function.
val engine = requireEngine<EngineType>()

story {
    ...
}
The val keyword indicates that this value cannot be reassigned.
You will need to replace EngineType with a specific engine type.
Each type of engine supports multiple functionalities. You will need to pick yours depending on what your story needs. Note however that some story players may not support all engine types.
Note that if engine A is a “subset” of engine B, it means that engine A is fully compatible with everything that is in engine B.
The following engine types should be considered standard and are all available for your script:
BaseEngine, a basic engine which only supports two functions,warnanderror, both of which can be used to display error messages to the userResourceEngine, an extension ofBaseEnginewhich supports resourcesCommonEngine(extension ofResourceEngine), a more advanced engine that supports additional general functions for more customization
StoryFX supports everything available in CommonEngine, ResourceEngine as well as BaseEngine
Resources
Some engines actions require something called “resources”. Resources are files that are external to your story. They should be placed in a folder named “resources” next to your story.kts file.
Any folder
+- mystory.story.kts
+- resources/
   +- (all of your resources)
Resources are not loaded automatically. You need to explicitly specify that
you want to load the resources, before using any of them. It is recommended to
put it before your story block and after the requireEngine call, like so:
val eng = requireEngine<...>()

loadResources()

story {
    ...
}
You can then get the resource like this:
resources["filename.jpg"]
Where filename.jpg is a file available in your resources folder:
Any folder
+- mystory.story.kts
+- resources/
   +- filename.jpg
Nested resources
Nested resources are also supported. Nested resources are resources that are in
a subfolder of your resources folder, like so:
Any folder
+- mystory.story.kts
+- resources/
   +- mypicture.jpg
   +- my_cat.png
   +- myfolder/
      +- anotherfile.mp3
      +- anotherfolder/
         +- yes.wav
The path to the resources simply uses a / to separate each directory. In
short, you can get the resources like this, following the example above:
// Directly in the resources directory
resources["mypicture.jpg"]
resources["my_cat.png"]
// In a subfolder
resources["myfolder/anotherfile.mp3"]
// In a subfolder of a subfolder
resources["myfolder/anotherfolder/yes.wav"]
StoryFX does not have limitations on how deep the nested resources can go, but your OS might have a restriction on how deep folders can go or how long paths can be.
Engine abilities
warn
Available in all engines
/**
 * Show a warning to the end user, usually appearing in a popup.
 *
 * @param message The message to display
 */
fun warn(message: String)
The warn function can be used to display a message to the user. For example:
val engine = requireEngine<BaseEngine>()

story {
    node(1) {
        body {
            """
            My option will display a message
            """
        }
        option { "Click me!" } does {
            engine.warn("Thanks for clicking me!")
            null
        }
    }
}
When the option is clicked, the following popup appears:

The warn function takes in a string parameter and does not return anything.
error
Available in all engines
The error function works in exactly the same way as the warn function. The only difference is the visual styling, where the error looks like an error whereas the warning looks like a warning.
/**
 * Show an error to the end user, usually appearing in a popup.
 *
 * @param message The message to display
 */
fun error(message: String)
askInput
Available in CommonEngine and its derivatives
/**
 * Ask the user for input (as a string) and returns what they answered,
 * usually in a popup. The user is forced to reply with a non-empty string.
 *
 * @param question The question that is displayed when the popup appears.
 */
fun askInput(question: String): String
The askInput allows you to ask the user for a text. This can be useful for
asking for the user’s name, for example.
Here is an example on how to use it:
val eng = requireEngine<CommonEngine>()

var name = ""

story {
    title = "Name asker"

    node(1) {
        body { "Tell me your name!" }
        option { "My name is..." } does {
            name = eng.askInput("What's your name?")
            nodeRef(2) // Go to node 2 afterwards
        }
    }

    node(2) {
        body { "Your name is $name!" }
    }
}
It takes in a string as a parameter, which is then displayed to the user, which will look similar to this:
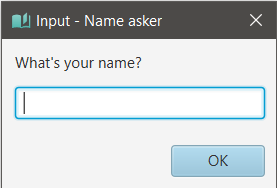
The title of the story is also displayed in the title bar.
This function takes in a parameter which is shown to the user, and returns a string, which is the answer the user gave.
imageBackground
Available in CommonEngine and all of its derivatives
/**
 * The resource to use as a background, shown behind the current node's text.
 */
var imageBackground: Resource?
The imageBackground property allows you to set the background of the nodes to one of your choosing. You need to have the background in your resources folder. You can set it like this:
eng.imageBackground = resources["filename.jpg"]
You can also set it to null to go back to having no background at all:
eng.imageBackground = resources["filename.jpg"]
Supported file types
All of the usual file types should be supported (PNG, JPG). However, for faster loading times, using JPG is encouraged.
Where should I change imageBackground?
This mostly depends on your story’s narrative and structure. It is recommended to either change it in a does block or a onNodeReached block.
- With
does(in an option), you get to modify the background when an option is selected - With
onNodeReached(in a node), you get to modify the background as soon as an option is reached. The background is applied before the text is shown, sinceonNodeReachedis called before actually showing the node to the user.
Examples
Assuming the following structure
Any folder
+- sample.story.kts
+- resources/
   +- image.jpg
val eng = requireEngine<CommonEngine>()

loadResources() // This must be in, otherwise our resources will not be loaded!

story {
    node(1) {
        body {
            """
            This is my beautiful node
            """
        }
        onNodeReached {
            eng.imageBackground = resources["image.jpg"]
        }
    }
}
font
Available in CommonEngine and its derivatives. The selection of available fonts may vary.
/**
 * The font to use for the story.
 */
var font: StoryFont
The value of this field determines which font will be used for the text. You cannot use resources here. You can choose from the following fonts:
- Default
StoryFont.MERRIWEATHER: A more classical serif font adapted for reading stories. StoryFont.MULI: A modern, all-purposes sans-serif font.
You can also create your own StoryFont objects using StoryFont("Font Name") to point to fonts that already exist on the system, although there are no ways of loading custom fonts at the moment.
It is recommended that you change the font before your story block, although you are free to modify it midway through the story.
For example:
val eng = requireEngine<CommonEngine>()

eng.font = StoryFont.MULI

loadResources()

story {
    ...
}
choice
The choice function and the choices DSL have their own separate page here.